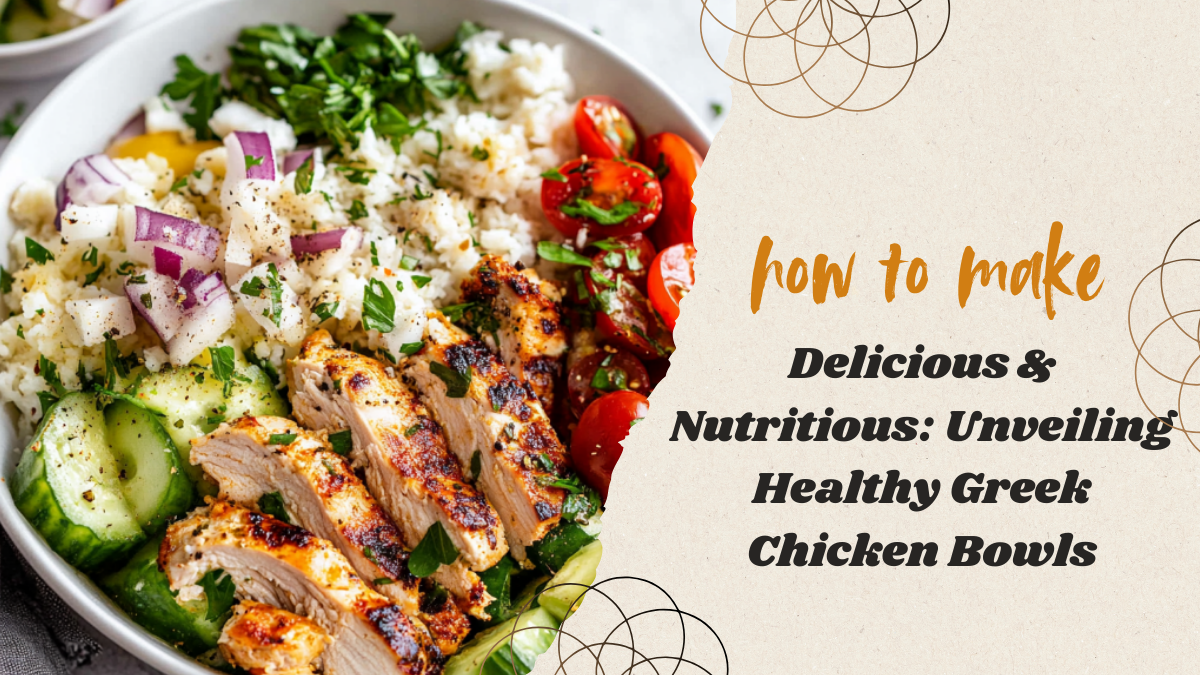
If you’re looking for a healthy, flavorful, and easy-to-make meal, look no further than these Healthy Greek Chicken Bowls! Packed with lean protein, vibrant vegetables, and a creamy Greek yogurt dressing, this dish is a Mediterranean-inspired delight.
Not only are these bowls delicious, but they’re also incredibly versatile—perfect for meal prep, quick lunches, or a wholesome family dinner. Whether you’re following a healthy diet or just love fresh flavors, this dish will quickly become a favorite in your kitchen.
Let’s dive into this nutrient-packed, flavor-loaded meal!
Ingredients You’ll Need
For the Marinated Greek Chicken
2 boneless, skinless chicken breasts (cut into strips)
3 tbsp olive oil
3 tbsp lemon juice (freshly squeezed)
3 cloves garlic (minced)
1 tsp dried oregano
½ tsp paprika
½ tsp salt
½ tsp black pepper
For the Base (Grains & Greens)
2 cups cooked quinoa or brown rice
2 cups mixed greens (spinach, arugula, or romaine)
For the Toppings
1 cup cherry tomatoes (halved)
1 cucumber (diced)
½ red onion (thinly sliced)
½ cup Kalamata olives (sliced)
½ cup feta cheese (crumbled)
For the Greek Yogurt Dressing
½ cup plain Greek yogurt
1 tbsp olive oil
1 tbsp lemon juice
1 clove garlic (minced)
½ tsp dried dill
Salt and pepper to taste
Step-by-Step Cooking Instructions
Step 1: Marinating the Chicken
In a bowl, whisk together olive oil, lemon juice, garlic, oregano, paprika, salt, and black pepper.
Add the chicken strips to the marinade and toss to coat.
Cover and let it marinate for at least 20 minutes (or up to overnight for deeper flavor).
Step 2: Cooking the Chicken
Heat a skillet or grill pan over medium-high heat.
Add the marinated chicken and cook for 4-5 minutes per side, until golden brown and cooked through.
Remove from heat and let it rest for a few minutes before slicing.
Step 3: Preparing the Base
Cook quinoa or brown rice according to package instructions.
Arrange mixed greens in serving bowls as a fresh base.
Step 4: Making the Greek Yogurt Dressing
In a small bowl, mix Greek yogurt, olive oil, lemon juice, garlic, dried dill, salt, and pepper.
Whisk until smooth and creamy.
Step 5: Assembling the Greek Chicken Bowls
Start with a layer of greens and grains.
Add sliced Greek chicken on top.
Arrange tomatoes, cucumber, red onion, olives, and feta cheese around the bowl.
Drizzle with Greek yogurt dressing and enjoy!
Why You’ll Love These Greek Chicken Bowls
Packed with Protein and Nutrients
Greek chicken bowls offer lean protein, healthy fats, and fiber-rich vegetables, making them an ideal balanced meal.
Fresh Mediterranean Flavors
Lemon, oregano, feta, and olives combine to create a refreshing and vibrant taste in every bite.
Great for Meal Prep
Prepare in advance and store in separate containers for a grab-and-go lunch or quick dinner option.
Variations and Substitutions
Make It Low-Carb
Swap out quinoa or rice for cauliflower rice or extra greens to cut down on carbs.
Make It Vegan
Replace the chicken with grilled tofu or chickpeas, and use dairy-free yogurt for the dressing.
Add Extra Protein
Include hard-boiled eggs, grilled shrimp, or extra feta cheese for a protein boost.
What to Serve with Greek Chicken Bowls
Pair your Greek chicken bowl with:
Whole-wheat pita or naan
Hummus and tzatziki
Lemon-infused sparkling water
Storing and Meal Prep Tips
Storing
Keep all components separate in airtight containers.
Refrigerate for up to 4 days.
Reheating
Warm the chicken separately before adding to the bowl.
Assemble fresh ingredients right before eating.
Conclusion
These Healthy Greek Chicken Bowls are an easy, delicious, and nutritious meal option. Whether you’re meal prepping for the week or making a fresh dinner, this recipe is packed with Mediterranean flavors and health benefits. Try it out and enjoy every bite!
FAQs
1. Can I make these Greek chicken bowls ahead of time?
Yes! Just store the components separately and assemble them when ready to eat.
2. What’s the best substitute for Greek yogurt in the dressing?
You can use plain dairy-free yogurt or tahini for a similar creamy texture.
3. Can I grill the chicken instead of pan-searing?
Absolutely! Grilling adds a smoky depth of flavor.
4. How do I keep the ingredients fresh for meal prep?
Store each ingredient in separate airtight containers to maintain freshness.
5. What’s the best way to make this dish dairy-free?
Replace Greek yogurt with coconut yogurt and feta with a dairy-free alternative.
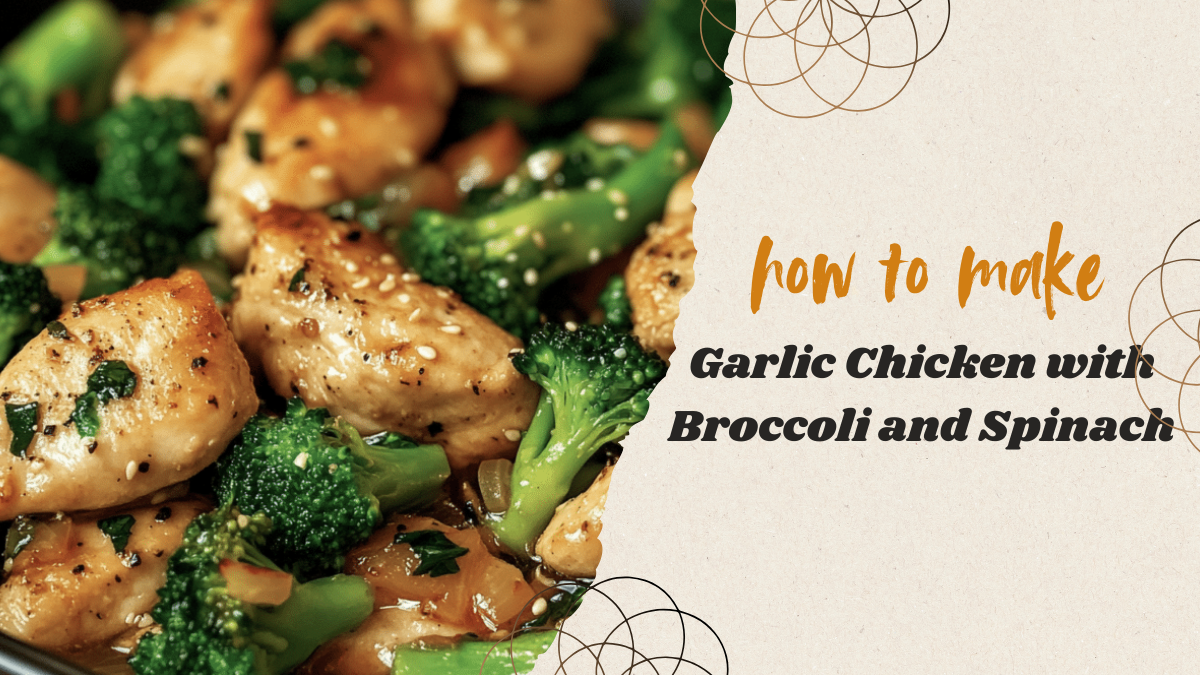
If you’re looking for a quick, flavorful, and healthy meal, Garlic Chicken with Broccoli and Spinach is the perfect choice! This dish is packed with protein, fiber, and rich garlicky flavor, making it a great weeknight dinner option. Plus, it’s easy to make in under 30 minutes!
The combination of tender chicken, crisp broccoli, and nutrient-rich spinach tossed in a savory garlic sauce will have you making this recipe over and over again. Let’s get cooking!
Ingredients You’ll Need
Before we start, let’s gather all the ingredients.
For the Chicken
2 boneless, skinless chicken breasts (cut into bite-sized pieces)
1 tbsp olive oil
½ tsp salt
½ tsp black pepper
½ tsp paprika
For the Garlic Sauce
3 tbsp unsalted butter
5 cloves garlic (minced)
1 cup low-sodium chicken broth
1 tbsp soy sauce
1 tsp honey (optional, for balance)
1 tsp cornstarch (mixed with 2 tbsp water to thicken)
Vegetables and Additional Ingredients
2 cups broccoli florets
2 cups fresh spinach
½ tsp red pepper flakes (optional, for heat)
1 tbsp lemon juice (for brightness)
Step-by-Step Cooking Instructions
Now that we have everything, let’s start cooking!
Step 1: Preparing the Ingredients
Chop the chicken into bite-sized pieces.
Mince the garlic and cut the broccoli into small florets.
Step 2: Cooking the Chicken
Heat olive oil in a large skillet over medium-high heat.
Add the chicken pieces and season with salt, black pepper, and paprika.
Cook for 5-7 minutes, stirring occasionally, until the chicken is golden brown and cooked through.
Transfer the chicken to a plate and set aside.
Step 3: Making the Garlic Sauce
In the same skillet, melt the butter over medium heat.
Add the minced garlic and sauté for 30 seconds until fragrant (be careful not to burn it!).
Pour in the chicken broth, soy sauce, and honey. Stir well.
Add the cornstarch slurry and let the sauce simmer for 2-3 minutes until slightly thickened.
Step 4: Cooking the Vegetables
Add the broccoli to the skillet and cook for 3-4 minutes until bright green and slightly tender.
Stir in the spinach and cook for another minute until wilted.
Step 5: Combining Everything Together
Return the cooked chicken to the skillet and toss everything together in the garlic sauce.
Add red pepper flakes for a little heat and squeeze fresh lemon juice on top.
Serve hot and enjoy!
Tips for the Best Garlic Chicken
Choosing the Best Chicken
Use fresh, boneless, skinless chicken breasts or thighs for the juiciest results.
How to Get the Perfect Garlic Flavor
Sauté garlic on low heat for a few seconds—this prevents it from burning and keeps the flavor rich.
The Secret to Crisp-Tender Broccoli and Spinach
Cook broccoli briefly to retain crunch and color. Add spinach last to avoid overcooking.
Variations and Substitutions
Make It Spicier
Add extra red pepper flakes or a splash of sriracha for more heat.
Make It Creamy
Stir in ¼ cup of heavy cream for a rich, creamy garlic sauce.
Make It Vegan
Replace chicken with tofu or chickpeas, and use vegetable broth instead of chicken broth.
What to Serve with Garlic Chicken
Here are some delicious pairings:
Steamed Rice – A classic, simple side.
Quinoa – A great high-protein option.
Garlic Bread – Because extra garlic is always a good idea!
Roasted Sweet Potatoes – Adds a touch of sweetness.
Storing and Reheating Instructions
Storing
Store leftovers in an airtight container in the fridge for up to 3 days.
Reheating
Reheat in a skillet over medium heat with a splash of water or broth to maintain moisture.
Conclusion
This Garlic Chicken with Broccoli and Spinach is a delicious and healthy meal that’s perfect for busy weeknights. It’s easy to make, packed with nutrients, and bursting with garlicky goodness. Try it out and enjoy a restaurant-quality dish in the comfort of your home!
FAQs
1. Can I use frozen broccoli and spinach?
Yes! Just thaw and drain them before cooking to avoid excess moisture.
2. What’s the best way to store leftovers?
Keep them in an airtight container in the fridge for up to 3 days.
3. Can I make this dish ahead of time?
Absolutely! Cook everything in advance and reheat when ready to serve.
4. How do I prevent garlic from burning?
Cook garlic on low heat for 30 seconds and stir constantly to avoid burning.
5. Can I add other vegetables to this recipe?
Of course! Bell peppers, mushrooms, or carrots would be great additions.
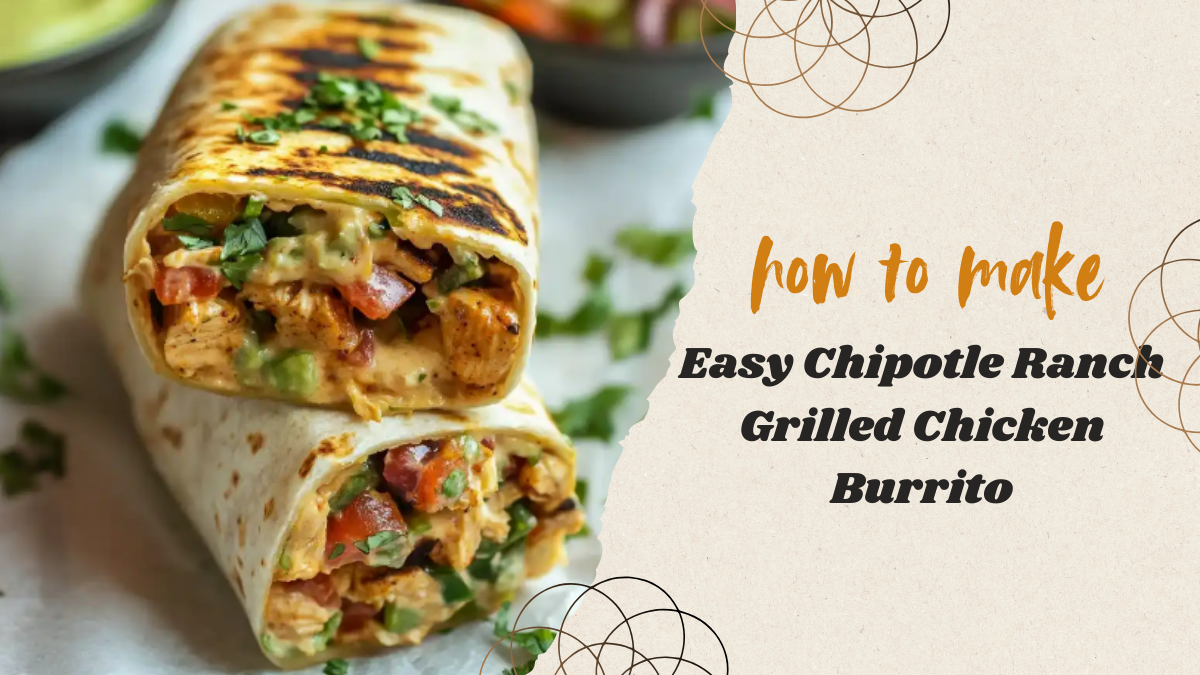
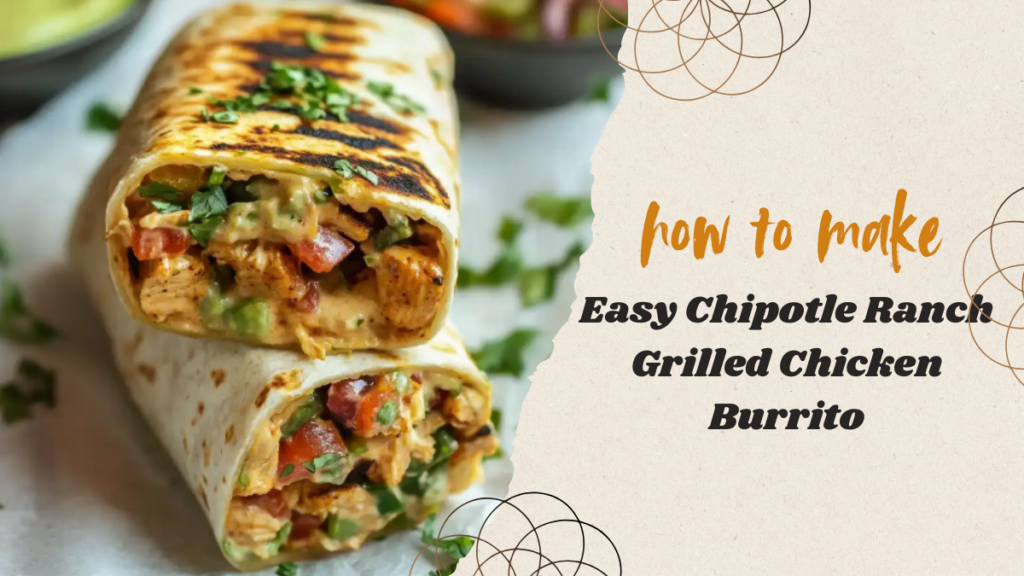
Who doesn’t love a hearty, flavorful burrito? If you’re craving something smoky, creamy, and packed with bold flavors, this Easy Chipotle Ranch Grilled Chicken Burrito is the answer! It’s the perfect balance of juicy grilled chicken, a creamy chipotle ranch sauce, and fresh toppings—all wrapped in a warm, golden tortilla.
Whether you’re making a quick lunch, meal-prepping for the week, or just want to satisfy your Tex-Mex cravings, this recipe will not disappoint. Let’s dive in!
Ingredients You’ll Need
Before we start cooking, let’s gather all the ingredients.
For the Grilled Chicken
2 boneless, skinless chicken breasts
1 tbsp olive oil
1 tsp garlic powder
1 tsp onion powder
1 tsp smoked paprika
½ tsp cumin
½ tsp salt
¼ tsp black pepper
Juice of 1 lime
For the Chipotle Ranch Sauce
½ cup mayonnaise
¼ cup sour cream
1 tbsp lime juice
1 chipotle pepper in adobo sauce (chopped)
1 tsp adobo sauce (from the can)
1 tsp garlic powder
1 tsp onion powder
½ tsp salt
½ tsp dried dill
Additional Burrito Fillings
4 large flour tortillas
1 cup cooked rice (white or brown)
½ cup black beans (rinsed and drained)
½ cup shredded cheese (cheddar or Mexican blend)
½ cup diced tomatoes
½ cup shredded lettuce
¼ cup chopped cilantro
How to Make Chipotle Ranch Grilled Chicken Burrito
Now that we have all the ingredients, let’s get cooking!
Step 1: Marinate and Grill the Chicken
In a bowl, mix the olive oil, garlic powder, onion powder, smoked paprika, cumin, salt, and black pepper.
Coat the chicken breasts with the marinade and let them sit for at least 20 minutes (or overnight for deeper flavor).
Heat a grill or grill pan over medium heat. Cook the chicken for 5-7 minutes per side until fully cooked.
Remove the chicken from the grill and let it rest for a few minutes before slicing it into strips.
Step 2: Make the Chipotle Ranch Sauce
In a small bowl, combine all the sauce ingredients: mayonnaise, sour cream, lime juice, chopped chipotle pepper, adobo sauce, garlic powder, onion powder, salt, and dried dill.
Mix well until smooth and creamy.
Step 3: Assemble the Burrito
Lay a flour tortilla on a flat surface.
Spread a spoonful of chipotle ranch sauce on the tortilla.
Add a layer of rice, black beans, grilled chicken, shredded cheese, tomatoes, lettuce, and cilantro.
Drizzle extra chipotle ranch sauce on top.
Step 4: Grill the Burrito for Extra Flavor
Fold in the sides of the tortilla, then roll it up tightly.
Heat a clean skillet over medium heat and grill the burrito for 2-3 minutes on each side until golden brown and crispy.
Tips for the Perfect Burrito
Choosing the Right Tortillas
Opt for large, soft flour tortillas to ensure they hold all the fillings without breaking.
How to Get the Best Grill Marks
Use a grill pan or cast-iron skillet and press the burrito down slightly with a spatula.
Storing and Reheating Tips
Wrap leftover burritos in foil and refrigerate for up to 3 days. Reheat in a skillet for the best texture.
Customization Ideas
Make It Spicier
Add extra chipotle peppers or drizzle some hot sauce inside.
Make It Healthier
Swap the sour cream for Greek yogurt and use whole wheat tortillas.
Make It Vegetarian
Replace chicken with grilled mushrooms or roasted sweet potatoes.
What to Serve with Your Burrito
Pair your burrito with these delicious sides:
Mexican Street Corn – Sweet, smoky, and cheesy!
Guacamole & Chips – A classic combo.
Fresh Salsa – Adds an extra zing!
Iced Horchata – A refreshing cinnamon rice drink.
Conclusion
This Easy Chipotle Ranch Grilled Chicken Burrito is packed with smoky, creamy, and savory flavors that’ll make it an instant favorite. Whether you enjoy it fresh off the grill or as a meal-prep option, this burrito is sure to impress. Try it today and let your taste buds thank you later!
FAQs
1. Can I use store-bought chipotle ranch dressing?
Yes! If you’re short on time, store-bought chipotle ranch works just fine.
2. How can I make this burrito ahead of time?
Assemble the burrito, wrap it in foil, and store it in the fridge. Just grill or reheat when you’re ready to eat.
3. Can I cook the chicken in a pan instead of grilling?
Absolutely! A cast-iron skillet works great for cooking the chicken with the same smoky flavors.
4. What’s the best way to reheat a burrito?
Reheat in a dry skillet over medium heat to keep it crispy. Avoid the microwave if possible!
5. Can I freeze these burritos for later?
Yes! Wrap them tightly in foil and freeze for up to 2 months.
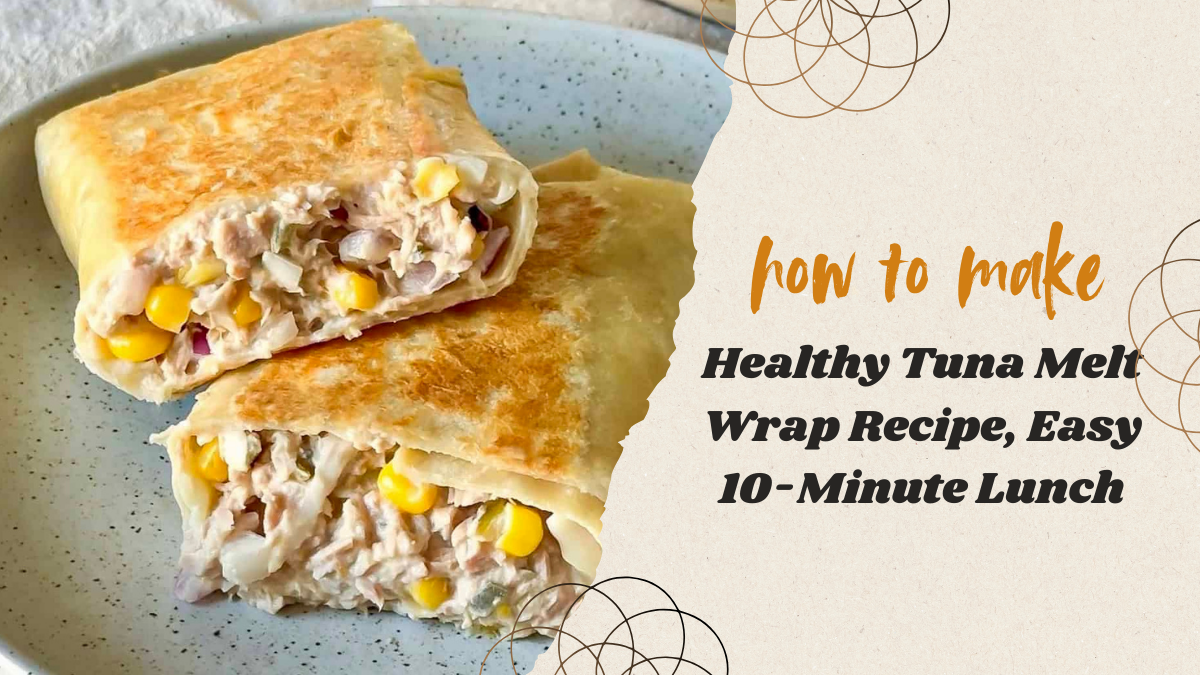
Looking for a quick, delicious, and healthy lunch? This Healthy Tuna Melt Wrap is the perfect solution! Packed with protein-rich tuna, melty cheese, and fresh ingredients, it’s a nutritious and satisfying meal that comes together in just 10 minutes. Whether you’re working from home or need a speedy meal, this wrap is an excellent choice.
Why a Tuna Melt Wrap is a Great Lunch Option
A tuna melt wrap is not only easy to make, but it’s also incredibly versatile. It offers a perfect balance of protein, healthy fats, and fiber, making it a great option for an energizing lunch. Plus, it’s lighter than a traditional tuna melt sandwich, thanks to the wrap, which cuts down on extra bread and calories.
Health Benefits of Tuna
Tuna is packed with lean protein, omega-3 fatty acids, and essential vitamins like B12 and D. It supports heart health, improves brain function, and helps maintain muscle mass. Choosing tuna packed in water instead of oil keeps it light and healthy.
Ingredients Needed
Essential Ingredients:
1 can of tuna (preferably packed in water, drained)
1 whole wheat or low-carb tortilla wrap
2 tbsp Greek yogurt or light mayo
1/4 cup shredded cheddar or mozzarella cheese
1 tsp Dijon mustard (optional, for extra flavor)
1 tbsp chopped red onion
1 tbsp chopped celery
1 tbsp chopped pickles or relish
Salt and pepper to taste
Optional Add-ons for Extra Flavor:
1 tsp lemon juice (for freshness)
1 tsp hot sauce (for a spicy kick)
1/4 cup baby spinach or arugula
1 slice of tomato
Step-by-Step Instructions
1. Preparing the Tuna Mixture
In a mixing bowl, combine tuna, Greek yogurt (or mayo), Dijon mustard, chopped onion, celery, and pickles. Mix well until everything is evenly coated. Add salt, pepper, and any optional seasonings.
2. Assembling the Wrap
Lay the tortilla flat and spread the tuna mixture evenly in the center. Sprinkle shredded cheese on top and add any extra ingredients like spinach or tomato slices.
3. Melting the Cheese to Perfection
Fold the wrap tightly like a burrito. Heat a non-stick pan over medium heat and cook the wrap for 2-3 minutes on each side until golden brown and crispy. The cheese should melt beautifully, holding everything together.
Tips for a Perfect Tuna Melt Wrap
Choosing the Right Tortilla
Opt for whole wheat or low-carb tortillas to make it healthier while adding fiber.
Best Cheese Options
Cheddar, mozzarella, or Swiss cheese all work great. For a dairy-free option, try vegan cheese.
How to Keep It Healthy
Using Greek yogurt instead of mayo and adding fresh veggies boosts nutrition without compromising taste.
Customization Ideas
Low-Carb Version
Use a lettuce wrap instead of a tortilla for a keto-friendly option.
Spicy Tuna Melt Wrap
Add hot sauce, jalapeños, or chili flakes to spice it up.
Mediterranean-Style Tuna Melt
Mix in feta cheese, olives, and cucumbers for a Greek-inspired twist.
Serving Suggestions
Pair your tuna melt wrap with a side salad, roasted veggies, or a cup of soup for a complete meal. For drinks, a lemon-infused water or green tea complements it perfectly.
Storage and Meal Prep Tips
How to Store Leftovers
Wrap it tightly in foil or an airtight container and store in the fridge for up to 2 days.
Making It Ahead of Time
Prepare the tuna mixture ahead and store it in the fridge. Assemble and heat the wrap just before serving.
Conclusion
This Healthy Tuna Melt Wrap is your ultimate go-to lunch—quick, easy, and packed with flavor! With endless customization options, you’ll never get bored of this nutritious, protein-packed meal. Give it a try today!
FAQs
1. Can I use canned tuna in oil instead of water?
Yes, but draining the oil well is recommended to keep it lighter and healthier.
2. What’s the best cheese for a tuna melt wrap?
Cheddar, mozzarella, and Swiss melt beautifully, but you can use any cheese you prefer.
3. Can I make this recipe dairy-free?
Absolutely! Swap regular cheese for vegan cheese and use dairy-free yogurt or mayo.
4. How do I make my tuna melt wrap crispy?
Cooking it in a non-s
5. Is this recipe kid-friendly?
Yes! Adjust seasonings to suit kids’ tastes, and they’ll love this delicious wrap.
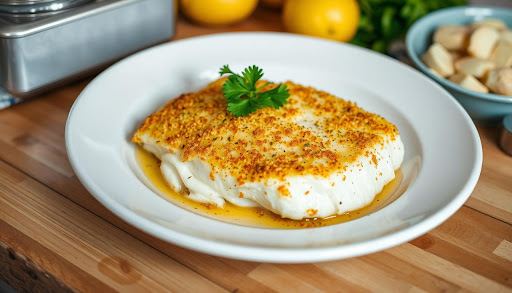
Imagine a dinner that’s both tasty and healthy, and easy to prepare. Our parmesan crusted cod recipe fits the bill. It’s a hit with its rich taste and crispy crust. It’s a quick and easy seafood dinner option, perfect for any night.
We aim to guide you through making a delicious parmesan crusted cod. This article will cover all you need to know. From ingredients and tools to step-by-step instructions and serving ideas, we’ve got you covered.
Introduction to Parmesan Crusted Cod
This recipe is ideal for a healthy, flavorful dinner. The parmesan crust gives the cod a nice crunch and flavor. It’s perfect for any weeknight or special occasion.
Key Takeaways
Our parmesan crusted cod recipe is a healthy and delicious dinner option
This recipe is easy to make and requires minimal ingredients
The parmesan crust adds a nice crunch and flavor to the cod
This dish is perfect for a weeknight dinner or a special occasion
We will provide a comprehensive guide to making this recipe, including ingredients, kitchen tools, and step-by-step instructions
This recipe is a great option for anyone looking for a quick and easy seafood dinner option
Why Parmesan Crusted Cod is the Perfect Dinner Choice
Parmesan crusted cod is a top pick for dinner. It’s full of flavor, nutritious, and easy to make. This dish is great for any night, thanks to its crispy parmesan crust. It’s loved by both kids and adults.
Cod fish is also very healthy. It’s packed with protein and omega-3s, which are good for your heart and brain. The parmesan adds a tasty flavor without losing any of the health benefits.
Health Benefits of Cod Fish
High in protein and omega-3 fatty acids
Low in saturated fat and calories
Rich in vitamins and minerals like vitamin D and selenium
The Magic of Parmesan Coating
The parmesan coating makes this recipe special. It’s a mix of parmesan cheese, breadcrumbs, and spices. This creates a crispy, flavorful crust that goes well with the cod.
Quick and Easy Preparation
This recipe is quick and simple to make. With just a few ingredients and steps, you can have a healthy dinner ready fast. It’s perfect for busy people or those new to cooking.
Ingredient
Quantity
Cod fillets
4
Parmesan cheese
1 cup
Breadcrumbs
1 cup
Essential Ingredients for the Perfect Parmesan Crusted Cod
To make a delicious parmesan crusted cod, you’ll need a few key ingredients. For cod recipes from frozen, choose high-quality frozen cod fish. Opt for wild-caught cod that’s been frozen fresh to keep its flavor and texture.
The parmesan coating is vital for this dish. You’ll need grated parmesan cheese, breadcrumbs, and seasonings for a crispy, flavorful crust. Fresh parsley and lemon zest add a bright, refreshing touch. Here’s what you’ll need to start:
1 pound of frozen cod fish, thawed
1/2 cup of grated parmesan cheese
1/4 cup of breadcrumbs
2 tablespoons of olive oil
Salt and pepper to taste
Fresh parsley and lemon zest for garnish
When preparing cod recipes from frozen, thawing the fish safely is crucial. You can thaw it in the fridge or under cold running water. After thawing, pat the fish dry with paper towels to remove excess moisture.
With these ingredients and a few simple steps, you can make a mouth-watering parmesan crusted cod. It’s perfect for a quick weeknight dinner or a special occasion meal. This dish is sure to impress your family and friends.
Kitchen Tools and Equipment You’ll Need
To make the perfect parmesan crusted cod, you’ll need some basic kitchen essentials. You’ll need a baking sheet, oven, and utensils like a spatula and tongs. For those looking to try airfryer cod recipes healthy options, an air fryer is a great choice. It cooks quickly and with little oil, making it perfect for a healthy meal.
For different cooking methods, you might want some optional equipment. For example, a microwave can cook microwave cod recipes fast and efficiently. Here are some tools you might find useful:
Baking sheet
Oven
Spatula
Tongs
Air fryer (optional)
Microwave (optional)
Using the right equipment is key to getting the perfect crispy crust on your parmesan crusted cod. Whether you’re using an airfryer or microwave, following the recipe instructions carefully is crucial for the best results.
Basic Kitchen Essentials
Before you start cooking, make sure you have all the necessary basic kitchen essentials. This will help you prepare and cook your parmesan crusted cod easily.
Optional Equipment for Different Cooking Methods
If you want to try different cooking methods, like airfryer cod recipes healthy or microwave cod recipes, you’ll need some additional equipment. Make sure to research and invest in the right tools for the best results.
Equipment
Description
Air Fryer
Used for cooking cod with minimal oil
Microwave
Used for quick and easy cooking
Oven
Used for baking and cooking cod
Preparing Your Cod Fish for Cooking
To get the best results with cod recipes from frozen, you need to prepare the fish right. This means thawing the cod and seasoning it with the right ingredients. Healthy cod dinner recipes need a mix of flavors and textures. You can get this by following a few simple steps.
When using frozen cod, thawing it properly is key for safety and flavor. Thawing frozen cod can be done by leaving it in the fridge overnight or by using cold water. After thawing, season the cod with herbs and spices to boost its taste.
Thawing Frozen Cod Properly
Thawing frozen cod is easy but takes some time. Here are a few tips to remember:
Leave the cod in the fridge overnight for slow and safe thawing.
Submerge the cod in cold water for quick thawing, changing the water every 30 minutes to avoid bacterial growth.
Seasoning and Coating Techniques
After thawing, season and coat the cod with parmesan. Sprinkle it with parmesan cheese, breadcrumbs, and herbs. Then, bake it until it’s crispy and golden. For healthier recipes, use whole wheat breadcrumbs and a light cheese coating to cut calories and fat.
By following these steps, you can make tasty and healthy cod dinner recipes. Whether you’re after cod recipes from frozen or healthy options, the secret is in proper preparation and seasoning.
Preparation Method
Thawing Time
Seasoning Suggestions
Refrigerator Thawing
8-12 hours
Herbs, spices, lemon juice
Cold Water Thawing
30 minutes to 1 hour
Garlic, paprika, salt, and pepper
Step-by-Step Guide to Making Parmesan Crusted Cod
To make a delicious parmesan crusted cod, start by preheating your oven to 400°F (200°C). This ensures your cod cooks evenly and the parmesan crust turns golden brown. Next, prepare your cod fillets by seasoning them with salt, pepper, and your favorite herbs.
Now, let’s make the parmesan crust. In a bowl, mix grated parmesan cheese, breadcrumbs, and a pinch of salt. Add some chopped parsley or basil for extra flavor. Once mixed, dip each cod fillet into the mixture, pressing the crust gently onto the fish.
Preheat your oven to 400°F (200°C)
Season your cod fillets with salt, pepper, and herbs
Mix together parmesan cheese, breadcrumbs, and salt
Dip each cod fillet into the parmesan crust mixture
Bake the cod in the oven for 12-15 minutes, or until it’s cooked through and the crust is golden brown
By following these steps, you’ll make a delicious parmesan crusted cod. It’s sure to impress your family and friends. This recipe is one of the many delicious cod recipes you can try. It’s a great way to enjoy a healthy and flavorful meal. So go ahead, give it a try, and enjoy your parmesan crusted cod!
Cooking Method
Cooking Time
Temperature
Oven
12-15 minutes
400°F (200°C)
Alternative Cooking Methods
There are many ways to cook parmesan crusted cod for a healthy meal. Using an air fryer is a great choice for those who want to cook with little oil. It’s quick and easy, making the cod crispy on the outside and tender inside.
For a quicker option, try microwave cod recipes. Just put the cod in the microwave and cook until it’s done. If you prefer something more traditional, cooking in a conventional oven works well. It makes the crust crispy and the inside tender.
Cooking Methods Comparison
Air Fryer: Quick and easy, with minimal oil
Microwave: Convenient and time-saving
Traditional Oven: Crispy crust and tender interior
Choosing the right cooking method is key to a delicious parmesan crusted cod. Use fresh, high-quality ingredients, no matter the method. This way, you can make a healthy, tasty meal for any occasion.
Cooking Method
Cooking Time
Temperature
Air Fryer
10-12 minutes
400°F
Microwave
3-4 minutes
High
Traditional Oven
12-15 minutes
400°F
Tips for Achieving the Perfect Crispy Crust
To get a crispy crust on your parmesan crusted cod, choose the right parmesan cheese. Look for high-quality, freshly grated parmesan. It will melt and crisp up well. Mixing breadcrumbs with the parmesan adds extra crunch.
When cooking, precision is key. Make sure your oven is at the right temperature. Cook the cod for the recommended time. Pan-frying with a bit of oil can also help get a crispy bottom.
Use fresh and high-quality ingredients, including parmesan cheese and cod fish
Cook the cod at the right temperature and for the right amount of time
Don’t overcrowd the pan or baking sheet, as this can prevent the cod from cooking evenly
By following these tips, you can make delicious cod recipes with a crispy crust. Try different seasonings and ingredients to find your favorite parmesan crusted cod recipe.
Remember, practice makes perfect. Don’t get discouraged if your first try at parmesan crusted cod isn’t perfect. Keep trying, and you’ll soon enjoy a crispy and delicious dish that will impress everyone.
Ingredient
Quantity
Cod fish
4 fillets
Parmesan cheese
1 cup
Breadcrumbs
1/2 cup
Healthy Modifications and Dietary Adaptations
There are many ways to make the parmesan crusted cod recipe healthier. For those on a weight watcher cod fish recipes diet, start by using less parmesan cheese. You can also swap regular breadcrumbs for whole wheat ones to boost fiber.
For a low-carb option, try almond flour or coconut flour instead of breadcrumbs. This cuts down carbs and adds a nice nutty taste. Making healthy cod dinner recipes is about balancing flavors and nutrients. A few tweaks can turn a tasty meal into a healthy one that meets your dietary goals.
Weight Watchers Friendly Version
To make a version friendly for weight watchers, mix parmesan cheese with reduced-fat mozzarella. This lowers calories and adds a creamy taste. Adding diced veggies like bell peppers or zucchini also ups the meal’s nutrition.
Low-Carb Alternatives
For a low-carb version, pair the parmesan crusted cod with roasted veggies or a salad. This cuts down carbs and adds flavor and nutrients. Other low-carb ideas include lettuce wraps or cauliflower rice with the cod.
With a few simple changes, you can enjoy a healthy, tasty meal that suits your diet. Whether you’re on a weight watcher cod fish recipes diet or prefer low-carb options, there are many choices. A bit of creativity and experimentation can lead to a delicious, nutritious dish.
Serving Suggestions and Side Dish Pairings
There are many ways to serve parmesan crusted cod. This tasty recipe goes well with different sides for a complete meal. Try it with roasted veggies like asparagus or Brussels sprouts for a healthy option.
A simple salad with mixed greens, cherry tomatoes, and a light vinaigrette is also a great choice. For a richer taste, pair it with garlic mashed potatoes or creamy risotto. The goal is to mix flavors and textures for a meal that’s both tasty and healthy.
Vegetable Sides
Roasted asparagus with lemon and parmesan
Grilled Brussels sprouts with balsamic glaze
Sauteed spinach with garlic and cherry tomatoes
Sauce Recommendations
A good sauce can make the parmesan crusted cod even better. Here are some popular choices:
Lemon butter sauce with herbs and capers
Tartar sauce with diced pickles and parsley
Marinara sauce with garlic and basil
Pairing the parmesan crusted cod with various sides and sauces makes for a healthy and tasty meal. It’s perfect for a quick dinner or a special occasion. Its crispy crust and flavorful cod make it a favorite dish.
Storing and Reheating Leftover Parmesan Cod
Storing and reheating leftover parmesan crusted cod is key to keeping its taste and texture. For those who enjoy cod recipes from frozen, it’s as important as making the dish. To store, put it in an airtight container and refrigerate or freeze. This keeps the fish fresh and stops bacteria from growing.
Reheating leftover parmesan cod is simple and tasty. You can use the oven or microwave. For the oven, preheat to 350°F (180°C) and bake for 10-12 minutes. For the microwave, cook on high for 30-45 seconds. These methods are great for healthy cod dinner recipes that are quick and easy.
Reheat the fish to an internal temperature of 145°F (63°C) to ensure food safety.
Use a thermometer to check the internal temperature of the fish.
Avoid overcooking the fish, as it can become dry and tough.
By following these easy steps, you can enjoy your leftover parmesan crusted cod. Whether you’re using cod recipes from frozen or making healthy cod dinner recipes, proper storage and reheating are crucial. They help you have a delicious and safe meal.
Storage Method
Reheating Method
Temperature
Refrigerate
Oven
350°F (180°C)
Freeze
Microwave
High for 30-45 seconds
Conclusion
As we wrap up this tasty adventure, it’s clear that parmesan crusted cod is a real treat. By following the steps and using the best ingredients, you can make this dish at home. The mix of flaky cod and crispy parmesan crust is unbeatable.
Choose to bake it in the oven or try air frying or microwaving. The goal is to get that perfect crust. With a few tips, you’ll make parmesan crusted cod like a pro. Serve it with your favorite sides for a meal that’s both healthy and delicious.
So, what are you waiting for? Start exploring parmesan crusted cod and show off your cooking skills. Bon appétit!
FAQ
What makes parmesan crusted cod a great dinner choice?
Parmesan crusted cod is a fantastic dinner option. It’s a healthy fish, rich in protein and omega-3s. The parmesan crust adds a tasty, crispy layer. Plus, it’s quick and simple to make, ideal for weeknights.
What type of cod fish should I use for this recipe?
Choose fresh or frozen cod fillets for the best taste. Frozen cod is easy and affordable. Look for firm, white fillets without any discoloration or strong smell.
What kitchen tools and equipment do I need to make parmesan crusted cod?
You’ll need a baking sheet, oven, and basic tools. For extra crispiness, consider an air fryer or microwave. An air fryer gives a crispy crust, while the microwave is quick.
How do I properly prepare the cod fish for cooking?
Thaw frozen cod in the fridge or microwave. Pat it dry with paper towels. Season with salt, pepper, and spices before coating with parmesan.
What tips can I use to achieve the perfect crispy parmesan crust?
Use freshly grated parmesan for a better crust. Coat the cod evenly and bake or air fry as directed. This ensures a crispy, golden crust.
Can I make this recipe healthier or adapt it to different dietary needs?
Yes, you can make it healthier or fit different diets. Use low-fat parmesan and serve with veggies or a salad for Weight Watchers. For low-carb, try a parmesan and almond flour coating.
What are some good side dish pairings for parmesan crusted cod?
Pair it with roasted broccoli, asparagus, or a fresh salad. A light lemon butter sauce or zesty tarter sauce adds extra flavor.
How can I store and reheat leftover parmesan crusted cod?
Store leftovers in an airtight container in the fridge for up to 3 days. Reheat in a preheated oven at 400°F for 5-10 minutes, or in the microwave for 1-2 minutes.